0%

提前叠个 buff:这个文章不涉及图(画起来比较麻烦),只是记录我的胡思乱想。

redis 从单点 -> 集群总共有三个部署模式:单机模式,主从模式,哨兵模式,集群模式

单机模式

新手入门模式。单机模式意味着 Redis 是单点的,部署在一台服务器,挂了就挂了,用在本地测试还可以,但是生产环境就算了。

优势

  1. 部署简单
  2. 省钱,一台服务器就可以了
  3. 不涉及主从复制等,数据强一致

劣势

  1. 单点意味着稳定性基本上为 0,挂了就挂了
  2. 吞吐量受限于单机资源

主从模式

当流量越来越大,单台机器资源不能无限增长,就需要水平扩展到多个节点,使用多个节点分散承接读流量。

主从模式为主节点承接写流量,从节点承接读流量,二者数据一致通过主节点异步复制(全量复制 / 增量复制)到从节点。

优势

  1. 读流量被分摊到多个节点上,读流量支持力度变大
  2. 当主节点宕机/不可用时,可以手动切换主节点继续提供服务

劣势

  1. 当主节点宕机/不可用时手动切换节点,切换过程中 redis (主节点)不可用,并且会丢失主节点 / 从节点之间未同步的数据
  2. 稳定性还是不够,依赖手动切换。不适用于生产。
  3. 写流量还是让主节点独自承受,写流量还是靠单机资源支撑

哨兵模式

哨兵模式主要解决主从模式中手动切换的部分,本质上哨兵代替了人,通过 gossip 协议监控主节点的健康情况。

优势

  1. 不用手动切换主节点了,切换过程中虽然 redis 也是不可用的,但是这个时间会极大的降低

劣势

  1. sentinel 与主节点多了一层心跳检测,有可能 sentinel 与主节点的网络抖动导致重新选举主节点。
  2. redis 主从节点吞吐因心跳检测可能稍微降低。

集群模式

集群模式主要解决了两个问题:写流量水平扩展 & 哨兵与主节点的网络抖动。

集群模式主要的架构为:主节点平分 16384 个槽,集群支持主节点的动态上线/下线(需要 rehash),主节点与从节点通过心跳关联,主节点失联后从节点有权发起选举成为主节点(raft 算法)。

优势

  1. 自管理集群内主从节点上下线,减少因外部集群网络抖动之类的发起的无效选举
  2. 数据按照 slot 存放在多个节点,客户端通过服务端主节点的重定向跳转到具体的槽,可动态调整数据分布
  3. 减少了集群整体不可用的概率,某一主节点宕机只影响一部分数据的访问
  4. 写流量 & 数据平分到多个节点,集群的写请求瓶颈得到缓解

劣势

  1. 集群间状态同步使用 gossip 协议,节点数较多存在较多的心跳网络流量
  2. 主节点的上线/下线需要进行 rehash ,当节点内数据较多耗时较长

redis 节点间复制有两种:全量复制 & 部分复制

全量复制

出现场景

  1. 从节点刚上线需要同步主节点的数据
  2. 从节点切换脑裂后从节点偏移量与主节点不一致的时间点
  3. 从节点偏移量不在主节点的复制缓冲区中

过程

  1. 从节点向主节点发起同步数据的请求
  2. 主节点通过 bgsave 形成当前数据的快照,发给从节点
  3. 从节点删除历史数据,加载主节点发过来 RDB 文件
  4. 从节点拉取主节点缓冲区数据,加载到自身的内存中,并更新当前的偏移量

部分复制

出现场景

  1. 全量复制出现场景之外的场景
  2. 主从日常复制

过程

  1. 主节点将命令同步到缓冲区(AOF)
  2. 从节点拉取缓冲区数据,更新到自身的节点中,并更新当前的偏移量

本文首发于cartoon的博客

转载请注明出处:https://cartoonyu.github.io

前言

缓存一致性常见的更新策略也比较多,如先更新数据库再更新缓存,先删缓存再更新数据库等等,我在理解的时候有些混乱,所以这个文章提供了一些理解上的技巧去理解缓存一致性。

为什么会有缓存一致性的问题

  1. 缓存与数据库是两套中间件,存在网络抖动之类的原因导致没有更新任一方的可能
  2. 数据库大多都是事务型的中间件,支持错误回滚,缓存大多是非事务型的中间件,这里缓存更新失败了没办法回滚

所以根因是缓存大部分不支持事务无法回滚。

怎么尽量解决缓存一致性的问题

操作二者必定有先后顺序,存在以下两个情况:

  1. 先操作缓存,再操作数据库。操作缓存成功,数据库更新失败,缓存无法回滚,数据不一致
  2. 先操作数据库,再操作缓存。操作数据库成功,缓存操作失败,可触发异常回滚数据库,数据一致

根据上述所列,只能先操作数据库,再操作缓存了。

操作缓存也分两种:

  1. 更新缓存数据,可能并发请求,后一请求更新缓存的数据被前一请求的更新覆盖了,导致数据不一致
  2. 删除缓存数据,并发请求,二者都使缓存失效,查询请求将数据库数据加载到缓存中,数据一致

根据上述所列,只能使缓存失效,查询请求加载数据到缓存中了。

所以,如果在不加任何重试措施的情况下,先操作数据库,再删除缓存是一个容错较好的方法。

缓存一致性的分类 & 存在的问题

Client 维护缓存 & 数据库的一致性

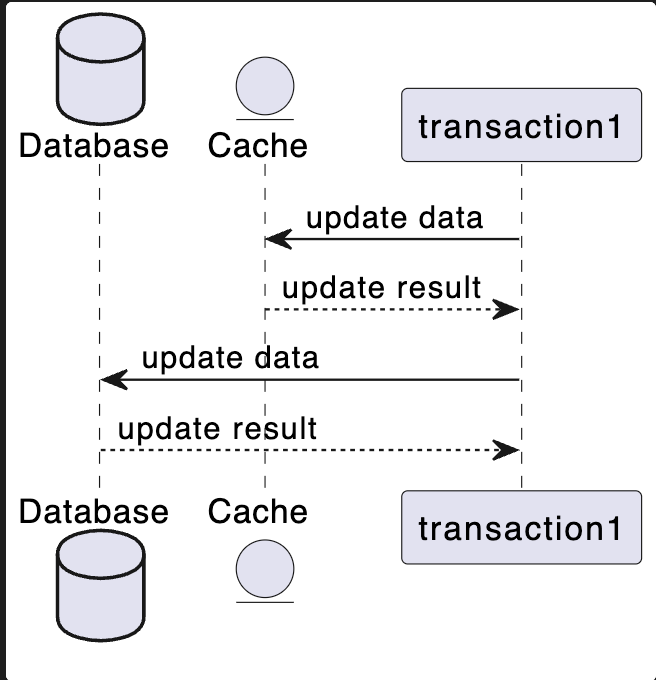
  1. 更新缓存 -> 更新数据库

    图片1

1
2
3
4
5
6
7
8
9
10
11
@startuml
Database Database as DB
entity Cache as Cache

transaction1 -> Cache: update data
transaction1 <-- Cache: update result

transaction1 -> DB: update data
transaction1 <-- DB: update result

@enduml
  • 可能出现的数据不一致

​ 数据不一致:更新缓存成功了,更新数据库失败了,有数据不一致的问题,直到缓存超时失效或又一更新请求操作成功都会不一致

  • 改进方式

    若保证更新数据仅有少数的服务更新,可以将更新数据库请求入队处理,且可加入重试机制。但是队列的加入会增大系统复杂度,并且重试以及缓存更新顺序不一致会加剧数据不一致

  1. 更新数据库 -> 更新缓存

1
2
3
4
5
6
7
8
9
10
11
12
13
14
15
16
17
18
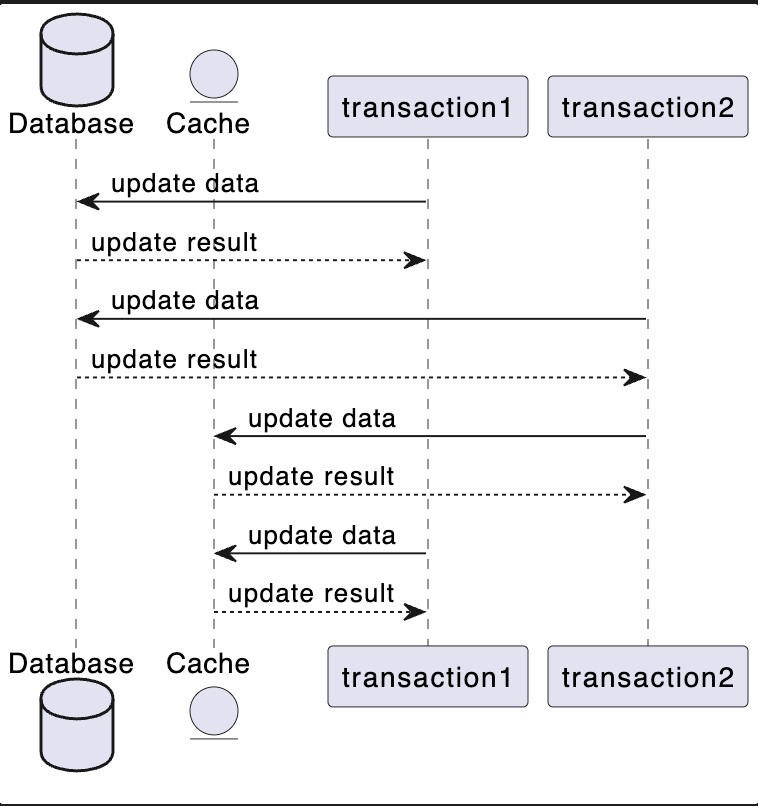
@startuml
Database Database as DB
entity Cache as Cache

transaction1 -> DB: update data
transaction1 <-- DB: update result

transaction2 -> DB: update data
transaction2 <-- DB: update result


transaction2 -> Cache: update data
transaction2 <-- Cache: update result

transaction1 -> Cache: update data
transaction1 <-- Cache: update result

@enduml
  • 可能出现的数据不一致

​ 数据不一致:如 t1 先更新数据库,t2 在 t1 更新缓存前把数据库缓存都更新完了,t1 再更新缓存,这时候缓存上是 t1 的数据,数据库是 t2 的数据

  • 改进方式

    若保证更新数据仅有少数的服务更新,可以将更新数据库请求入队处理,但是队列更新的引入增大了系统复杂度

  1. 删除缓存 -> 更新数据库

1
2
3
4
5
6
7
8
9
10
11
12
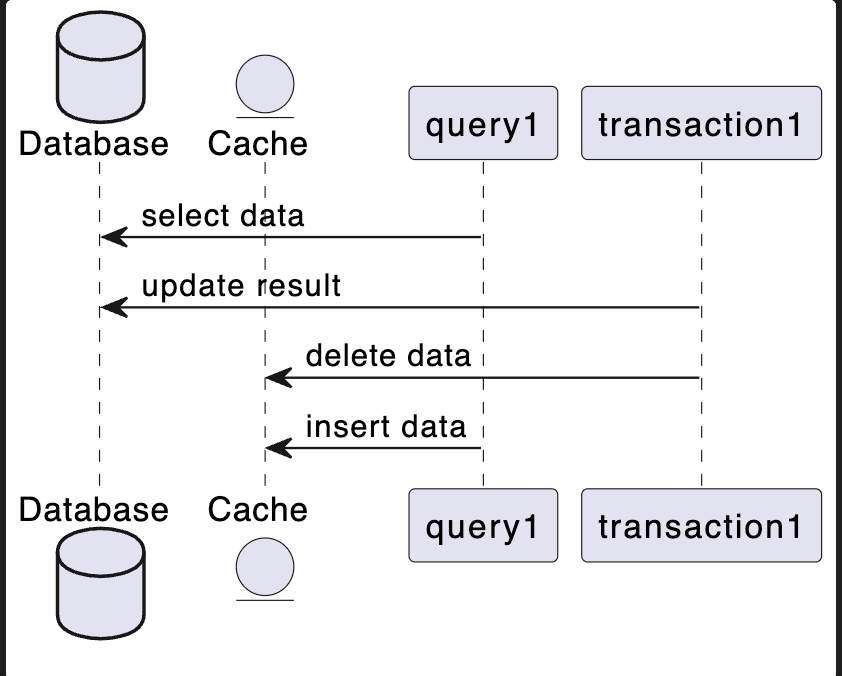
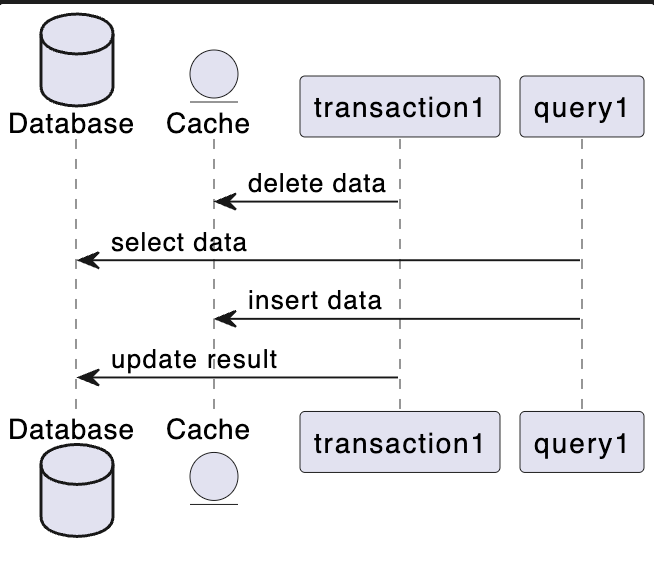
@startuml
Database Database as DB
entity Cache as Cache

transaction1 -> Cache: delete data

query1 -> DB: select data
query1 -> Cache: insert data

transaction1 -> DB: update result

@enduml
  • 可能出现的数据不一致

    1. 如图所示,更新请求先删除缓存,查询请求从缓存获取不到数据从数据库获取数据(老数据)加载到缓存中,更新请求更新数据库
    2. 这样的流程会导致查询请求加载老数据到缓存中,后续更新请求更新新数据到数据库中,导致数据不一致
  • 改进方式

    暂无。

  1. 更新数据库 -> 删除缓存

1
2
3
4
5
6
7
8
9
10
@startuml
Database Database as DB
entity Cache as Cache

query1 -> DB: select data
transaction1 -> DB: update result
transaction1 -> Cache: delete data
query1 -> Cache: insert data

@enduml
  • 可能出现的数据不一致

    查询请求先拿到数据,在插入缓存前更新请求进来更新数据库并使缓存失效,这个请求比较罕见

    1. 发生的场景
      1. 查询请求所在机器请求缓存比更新请求做完的整个流程都要慢
    2. 发生的概率
      1. 很低。因为操作缓存一般会比操作数据库要快
  • 改进方式

    1. 变更数据记录变更事件
      1. 步骤
        1. 更新数据同步记录一个事件在本地内存中
        2. 查询请求在插入缓存前查询事件,如果存在变更则查数据库获取最新数据
        3. 如果此数据在查询请求插入缓存过程中一直变更,这里需要先返回当前数据库结果给上游,再开异步任务轮训事件/数据库插入缓存
      2. 适用场景
        1. 只适用单节点

Server 维护缓存 & 数据库的一致性

  1. Read though/Write though

    • read though

    1
    2
    3
    4
    5
    6
    7
    8
    9
    10
    11
    12
    13
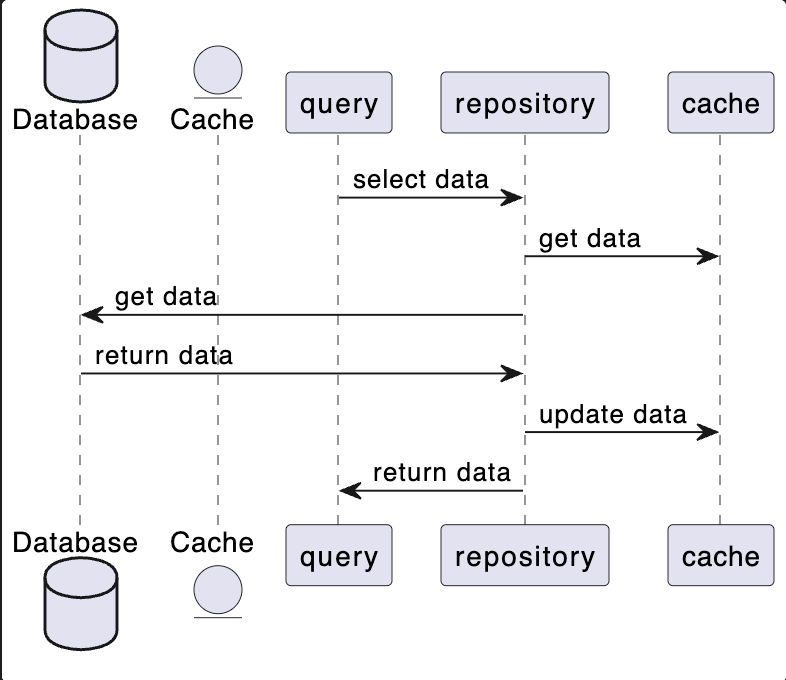
    @startuml
    Database Database as DB
    entity Cache as Cache

    query -> repository: select data

    repository -> cache: get data
    repository -> DB: get data
    DB -> repository: return data
    repository -> cache: update data
    repository -> query: return data

    @enduml
    • wirte though

    1
    2
    3
    4
    5
    6
    7
    8
    9
    10
    11
    12
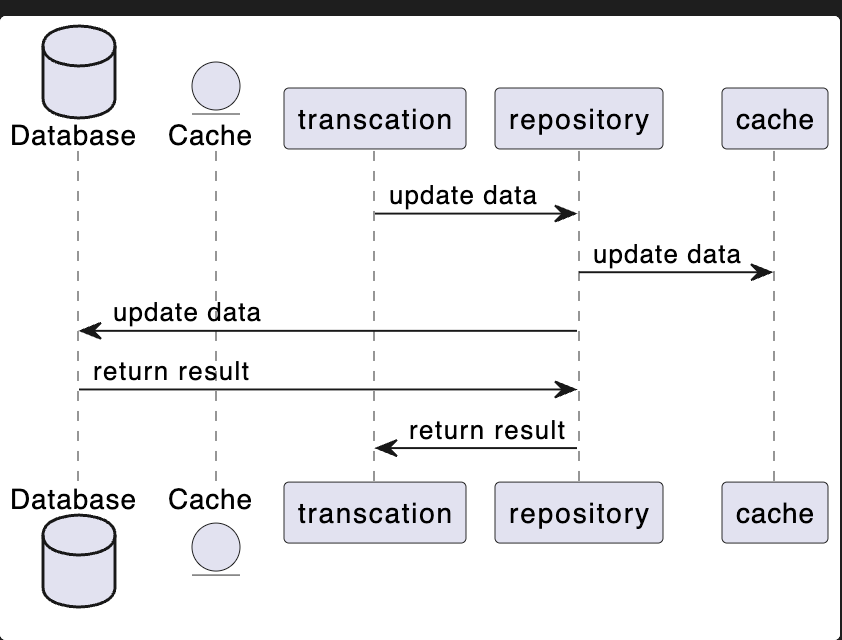
    @startuml
    Database Database as DB
    entity Cache as Cache

    transcation -> repository: update data

    repository -> cache: update data
    repository -> DB: update data
    DB -> repository: return result
    repository -> transcation: return result

    @enduml
  • 可能出现的数据不一致
    • 程序没有优雅关闭,更新请求先更新了缓存,但还没更新数据库,数据丢失
    • 更新缓存成功,更新数据库失败导致的数据不一致
  • 适用场景
    • 更新数据库极低概率失败
    • 程序有优雅关闭功能
  • 改进方式
    • 暂无
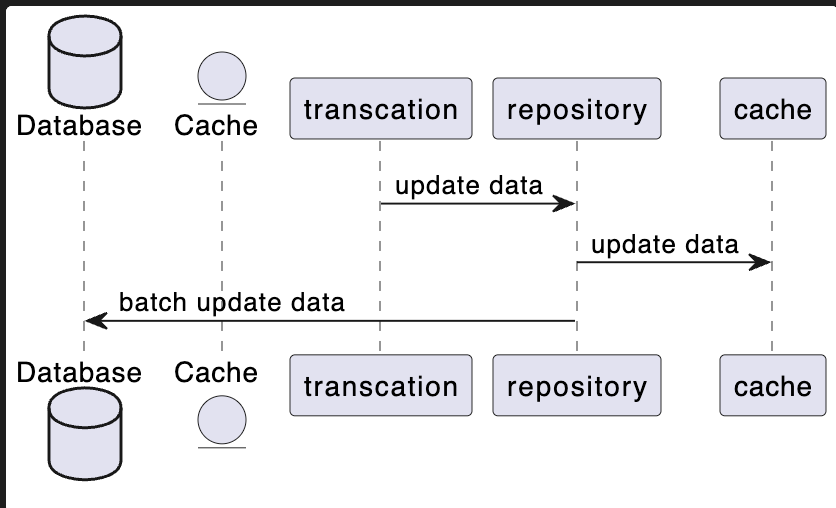
  1. Write Behind

1
2
3
4
5
6
7
8
9
10
11
12
13
14
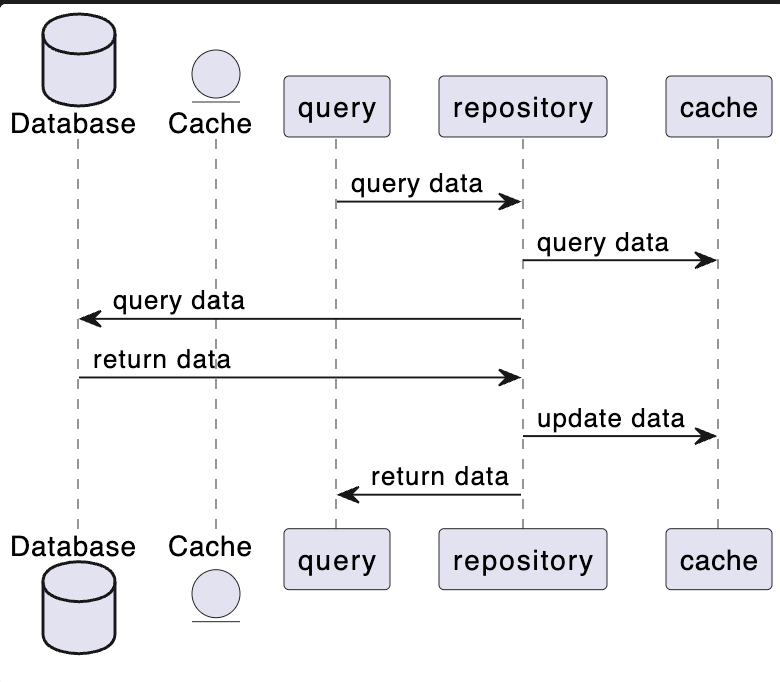
@startuml
Database Database as DB
entity Cache as Cache

query -> repository: query data

repository -> cache: query data
repository -> DB: query data
DB -> repository: return data
repository -> cache: update data

repository -> query: return data

@enduml

1
2
3
4
5
6
7
8
9
10
11
@startuml
Database Database as DB
entity Cache as Cache

transcation -> repository: update data

repository -> cache: update data

repository -> DB: batch update data

@enduml
  • 可能出现的数据不一致
    • 程序没有优雅关闭,更新请求先更新了缓存,但还没更新数据库,数据丢失
    • 批量更新数据库失败导致的数据不一致
  • 适用场景
    • 更新数据库极低概率失败
    • 程序有优雅关闭功能
  • 改进方式
    • 暂无

参考

https://coolshell.cn/articles/17416.html

本文首发于cartoon的博客

转载请注明出处:https://cartoonyu.github.io

前段时间在看 kafka 相关内容,发现 kafka “所有的”读写流量都在主 partition 上,从 partition 只负责备份数据。

那么为什么 kafka 从 partition 不跟其他中间件一样承接读流量?

读写分离的初衷

读写分离的初衷我觉得是利用读流量 & 写流量不同的特性做针对性的优化,而这两种流量我觉得区别如下

读流量 写流量
业务特性 展示类的业务 操作类业务
流量占比
可接受数据延迟 较大 非常小
增长的可预见性 高峰/安全攻击可能会突发增长 总体平稳

使用 kafka 的业务特征

  1. 操作型业务,consumer 消费 producer 生产的消息,进行自身业务,这个消息就类似于 trigger
  2. 可支撑的流量较大,并且可支撑下游 consumer 较多,rebalance 需要一定的时间

kafka 架构

  1. 以 topic 为单位,一 topic 可拆分多个 partition,每个 partition 都可以有多个从 partition,不同 partition 分布在不同 broker 上
  2. 以 partition 为单位,形成 AR(Assigned Repllicas),ISR(In Sync Repllicas),OSR(Out Sync Repllicas),主 partition 接收到消息后按照 ack 策略同步到 ISR 中从 partition
    1. ack = 0,producer 发出消息后就不管了
    2. ack = 1,producer 发出消息写入主 partition 所在 broker 的磁盘就算成功
    3. ack = all,producer 发出消息写入主 partition 以及 ISR 上所有副 partition 的磁盘才算成功

kafka 没有主从读写分离的原因

  1. 不能主从读写分离的原因
    1. kafka 承接的大多是操作型业务,这部分读操作对数据延迟非常敏感。
    2. kafka 主从同步为半同步复制,并且有部分 partition 在 OSR 上,数据延迟较大
    3. kafka 主 partition 接收到消息后,可以根据 ack 策略落盘,如果不是 all 的话存在数据丢失的风险
  2. 不需要主从读写分离的原因
    1. kafka 本身就是多 partition 的架构,不同 parition 在不同的 broker 上,多主节点的结构本身分流了流量
    2. kafka 本身就有成熟的 rebalance 机制,partition 上线与下线都比较无感

本文首发于cartoon的博客

转载请注明出处:https://cartoonyu.github.io

NOTICE:本文仅记录本人对 JVM G1 的小小理解,没有详细记录每个点,若有误可指出

内存区域

G1 将堆分为各个 region,大小通过 G1HeapRegionSize 指定

region 分类
按 region 大小分
  1. 普通 region,存放大小小于普通 refion 容量的一半的对象
  2. humongous 区域,存放大对象
按功能来分
  1. 新老代
  2. 老年代(humongous 只能在老年代)

新对象进入

  1. 新对象根据大小进入普通 region /humongous
  2. 记忆集维护
    1. 本 region 维护一个记忆集,记忆集都是别的 region 对象指向本 region 的引用
    2. 写前屏障,处理 SATB,将修改前引用对象放入 SATB 队列
    3. 写后屏障,标记被修改的对象所在卡表为 dirty card

垃圾回收

回收依据

维护每个 region 中垃圾的价值(回收获得的空间大小以及所需时间的比值)大小,通过最大 GC 时间(-XX:MaxGCPauseMillis)优先处理价值大的 region

回收分类
  1. Young GC
  2. Mixed GC(老年代中的内存比例超过IHOP)
回收步骤
  1. 初始标记
    1. 标记 GC Root 直接关联的对象
    2. 生成原始快照
    3. 修改 TAMS 的值
    4. 需要 Stop the world
  2. 并发标记
    1. 从 GC Root 开始进行可达性分析
    2. 处理 SATB 记录的引用变动的对象
  3. 最终标记
    1. 处于并发阶段遗留的少量 SATB 记录
  4. 筛选回收
    1. 计算各个 region 回收价值
    2. 回收
      1. 将回收 region 中存活对象挪到空 region 中
      2. 清空原有 region
标记过程中问题处理
  1. 在并发标记中,有新对象生成
    1. 通过 TAMS 划分特定区域
    2. 新对象只能放在 TAMS 区域中,并且默认是黑色的
  2. 在并发标记进行可达性分析,引用变动的对象处理
    1. 使用 SATB 记录灰色到白色删除的引用
    2. 在最终标记以灰色的对象为根,重新扫描一次
停顿分析
  1. 初始标记是 STW 的,但是只标记 GC Root,所以停顿时间较短
  2. 并发标记因为是与应用线程并发进行的,所以即使需要进行可达性分析,但是也不会停顿
  3. 最终标记,因为并发标记漏的对象比较少,所以即使 STW,停顿也不长
  4. 筛选回收,因为 G1 实际是用的是复制算法,复制对象时间可能较长,所以耗时较多是在此阶段

概念解释

三色标记法
  1. 黑色意义为被访问过的对象,引用都扫描过,并且确认最后是存活的,GC Root 默认为黑色
  2. 灰色意义为被访问过的对象,有一个引用未被扫描过,未确定是否存活
  3. 白色意义为未被访问过的对象
对并发标记中对象引用变化处理
SATB
  1. 全称为 Snapshot At The Beginning
  2. Region 包含 5 个指针
    1. bottom
    2. previous TAMS
    3. next TAMS
    4. top
    5. end
  3. 作用流程
    1. 并发标记中,新创建的对象在 next TAMS -> top 之间,此区间默认为黑色,默认存活
    2. 灰色对象删除指向白色的引用,记录下来
    3. 以记录下来的灰色为根,重新扫描
Incremental Update
  1. 黑色插入新的指向白色的引用,记录下来
  2. 并发扫描结束后,以记录下来的黑色为根,重新扫描一遍

参考

https://blog.51cto.com/u_15072811/4679940

本文首发于cartoon的博客

转载请注明出处:https://cartoonyu.github.io
近段时间在学习缓存相关知识的时候,看到了缓存更新策略,于是就根据自己的理解,写下这篇文章

分类
  • Cache Aside
  • Read / Write Though
  • Write Behind
Cache Aside
  1. 步骤

    1. 读请求未命中缓存,取数据库数据,并回写缓存
    2. 写请求先更新数据库,再让缓存失效
  2. 优点

    1. 实现简单,调用者可控制数据持久化的细节
  3. 缺点

    1. 上层需要同时管理缓存与持久化,调用较复杂
    2. 写请求与读请求并发,读请求持续时间比写请求长,可能会覆盖旧数据到缓存中
  4. 使用场景

    1. 允许缓存数据不准确的场景
    2. 因为并发情况下,可能造成脏数据的情况,所以 QPS 较低场景也可以适用
  5. 代码示例

1
2
3
4
5
6
7
8
9
10
11
12
13
14
15
16
17
18
19
20
21
22
23
24
25
26
27
28
29
30
public class CacheAside<T, K> implements CacheUpdate<T, K>{
private Map<K, T> map;

@Override
public T getData(K key) {
//if cache has data, return
return map.get(key);
}

@Override
public boolean updateData(K key, T data) {
map.remove(key, data);
return true;
}

@Override
public boolean addData(K key, T data) {
return Objects.nonNull(map.put(key, data));
}

@Override
public boolean removeData(K key) {
map.remove(key);
return true;
}

public CacheAside() {
map = new HashMap<>();
}
}
  1. 调用示例
1
2
3
4
5
6
7
8
9
10
11
12
13
14
15
16
17
18
19
20
21
22
23
24
25
26
27
28
29
30
31
32
33
34
35
36
37
38
39
40
41
42
43
44
45
46
47
48
49
50
51
52
53
54
public class CacheAsideClient<T, K> implements CacheUpdateClient<T, K>{

public CacheUpdateFactory<T, K> factory = CacheUpdateFactory.getInstance();

private CacheUpdate<T, K> cacheUpdate;

private DatabaseOperation<T, K> databaseOperation;

@Override
public T getData(K key){
//get data from cache
T dataFromCache = cacheUpdate.getData(key);
//if cache haven't, get from database and put to cache
if(Objects.nonNull(dataFromCache)){
return dataFromCache;
}
T dataFromDatabase = databaseOperation.getData(key);
cacheUpdate.addData(key, dataFromDatabase);
return dataFromDatabase;
}

@Override
public boolean updateData(K key, T data){
//update data to database
boolean updateToDatabaseRes = databaseOperation.updateData(key, data);
if(updateToDatabaseRes){
//invalid cache data
return cacheUpdate.removeData(key);
}
return false;
}

@Override
public boolean addData(K key, T data){
//add data to database
return databaseOperation.addData(key, data);
}

@Override
public boolean removeData(K key){
//remove from database
boolean removeFromDatabaseRes = databaseOperation.removeData(key);
if(removeFromDatabaseRes){
//invalid cache data
return cacheUpdate.removeData(key);
}
return false;
}

public CacheAsideClient() {
cacheUpdate = factory.getObject(CacheUpdateEnum.CACHE_ASIDE);
databaseOperation = (DatabaseOperation<T, K>) new MockDatabaseOperation<T>();
}
}
Read / Write Though
  1. 步骤

    1. 读/写请求都只依赖缓存
    2. 缓存数据同步持久化
  2. 优点

    1. 上层对数据是否持久化/持久化实现无感
  3. 缺点

    1. 同步持久化性能较低,但能有效保证数据一致性
  4. 使用场景

    1. 性能要求不高的场景
  5. 代码示例

1
2
3
4
5
6
7
8
9
10
11
12
13
14
15
16
17
18
19
20
21
22
23
24
25
26
27
28
29
30
31
32
33
34
35
36
37
38
39
40
41
public class ReadOrWriteThough<T, K> implements CacheUpdate<T, K>{

private DatabaseOperation<T, K> databaseOperation;

private Map<K, T> map;

@Override
public T getData(K key) {
//if cache has data, return
if(map.containsKey(key)){
return map.get(key);
}
//get data from database and write to cache
T data = databaseOperation.getData(key);
map.put(key, data);
return data;
}

@Override
public boolean updateData(K key, T data) {
map.put(key, data);
return databaseOperation.updateData(key, data);
}

@Override
public boolean addData(K key, T data) {
map.put(key, data);
return databaseOperation.addData(key, data);
}

@Override
public boolean removeData(K key) {
map.remove(key);
return databaseOperation.removeData(key);
}

public ReadOrWriteThough() {
databaseOperation = (DatabaseOperation<T, K>) new MockDatabaseOperation<>();
map = new HashMap<>();
}
}
  1. 调用示例
1
2
3
4
5
6
7
8
9
10
11
12
13
14
15
16
17
18
19
20
21
22
23
24
25
26
27
28
29
30
public class ReadOrWriteThoughClient<T, K> implements CacheUpdateClient<T, K>{

private CacheUpdateFactory<T, K> factory = CacheUpdateFactory.getInstance();

private CacheUpdate<T, K> cacheUpdate;

@Override
public T getData(K key) {
return cacheUpdate.getData(key);
}

@Override
public boolean updateData(K key, T data) {
return cacheUpdate.updateData(key, data);
}

@Override
public boolean addData(K key, T data) {
return cacheUpdate.addData(key, data);
}

@Override
public boolean removeData(K key) {
return cacheUpdate.removeData(key);
}

public ReadOrWriteThoughClient() {
cacheUpdate = factory.getObject(CacheUpdateEnum.READ_WRITE_THOUGH);
}
}
Write Behind
  1. 步骤

    1. 读/写请求都只依赖缓存
    2. 缓存数据异步批量持久化
  2. 优点

    1. 上层对数据是否持久化/持久化实现无感
    2. 异步持久化,性能较 Read /Write Though 提高
  3. 缺点

    1. 异步持久化可能会导致数据丢失
  4. 使用场景

    1. 性能要求较高的场景
    2. 允许持久化数据丢失场景
  5. 代码示例

1
2
3
4
5
6
7
8
9
10
11
12
13
14
15
16
17
18
19
20
21
22
23
24
25
26
27
28
29
30
31
32
33
34
35
36
37
38
39
40
41
42
43
44
45
46
public class WriteBehind<T, K> implements CacheUpdate<T, K> {

private Map<K, T> map;

private DatabaseOperation<T, K> databaseOperation;

private ThreadPoolExecutor threadPoolExecutor;

@Override
public T getData(K key) {
if(map.containsKey(key)){
return map.get(key);
}
T data = databaseOperation.getData(key);
map.put(key, data);
return data;
}

@Override
public boolean updateData(K key, T data) {
map.put(key, data);
threadPoolExecutor.execute(() -> databaseOperation.updateData(key, data));
return true;
}

@Override
public boolean addData(K key, T data) {
map.put(key, data);
threadPoolExecutor.execute(() -> databaseOperation.addData(key, data));
return true;
}

@Override
public boolean removeData(K key) {
map.remove(key);
threadPoolExecutor.execute(() -> databaseOperation.removeData(key));
return true;
}

public WriteBehind() {
map = new HashMap<>();
databaseOperation = (DatabaseOperation<T, K>) new MockDatabaseOperation<>();
threadPoolExecutor = new ThreadPoolExecutor(5, 10, 1000, TimeUnit.SECONDS, new ArrayBlockingQueue<>(1000), new ThreadPoolExecutor.CallerRunsPolicy());
}

}
  1. 调用示例
1
2
3
4
5
6
7
8
9
10
11
12
13
14
15
16
17
18
19
20
21
22
23
24
25
26
27
28
29
30
public class WriteBehindClient<T, K> implements CacheUpdateClient<T, K>{

private CacheUpdateFactory<T, K> cacheUpdateFactory = CacheUpdateFactory.getInstance();

private CacheUpdate<T, K> cacheUpdate;

@Override
public T getData(K key) {
return cacheUpdate.getData(key);
}

@Override
public boolean updateData(K key, T data) {
return cacheUpdate.updateData(key, data);
}

@Override
public boolean addData(K key, T data) {
return cacheUpdate.addData(key, data);
}

@Override
public boolean removeData(K key) {
return cacheUpdate.removeData(key);
}

public WriteBehindClient() {
cacheUpdate = cacheUpdateFactory.getObject(CacheUpdateEnum.WRITE_BEHIND);
}
}
总结
分类 优点 缺点 使用场景
Cache Aside 1. 实现简单,调用者可控制数据持久化的细节 1. 写请求与读请求并发,读请求持续时间比写请求长,可能会覆盖旧数据到缓存中
2. 上层需要同时管理缓存与持久化,调用较复杂
1. 允许缓存数据不准确的场景
2. 因为并发情况下,可能造成脏数据的情况,所以 QPS 较低场景也可以适用
Read / Write Though 1. 上层对数据是否持久化/持久化实现无感 1. 同步持久化性能较低,但能有效保证数据一致性 1. 性能要求不高的场景
Write Behind 1. 上层对数据是否持久化/持久化实现无感
2. 异步持久化,性能较 Read /Write Though 提高
1. 异步持久化可能会导致数据丢失 1. 性能要求较高的场景
2. 允许持久化数据丢失场景

本文首发于cartoon的博客

转载请注明出处:https://cartoonyu.github.io
近段时间在服务器搭建中间件,发现物理内存不足,因为对性能要求不高,所以就求助 swap 了。

下面是 ubuntu 的 swap 构建的步骤

  1. 新建 swap 文件(/root/swapfile)
1
2
3
4
dd if=/dev/zero of=/root/swapfile bs=1M count=8192

swap 文件位置:/root/swapfile
swap 文件大小:bs(文件块)* count(块数)
  1. 格式化 swap
1
mkswap /root/swapfile
  1. 启动 swap
1
swapon /root/swapfile
  1. 开机自启动(非必要)

    1. 打开 /etc/fstab
    2. 在文件末尾追加以下内容
    1
    /root/swapfile swap swap defaults 0 0
  2. 关闭 swap (可在不需要)

1
swapoff -a

以上就是 Linux 下新建 swap 缓存的步骤。

本文首发于cartoon的博客

转载请注明出处:https://cartoonyu.github.io
前言

近段时间在了解分布式时,经常绕不开一个算法: 一致性哈希算法。于是在了解并实践这个算法后,就有了此文章。

算法间的对比

在分布式分片中,存在着几种算法: 取模,分段,一致性 hash。

取模 分段 一致性哈希
上层是否感知
迁移成本 低,只涉及相邻节点
单点故障影响 低,只影响相邻节点
算法复杂度
热点数据 存在 存在 存在

一致性哈希主要解决问题

从上述对比可知,一致性哈希主要降低节点上下线中带来的数据迁移成本,同时节点数量的变化与分片原则于上层无感,使上层更专注于领域内逻辑的编写,使整体架构更加灵活。

一致性 hash 原理

  1. 基本数据结构

​ 基本数据类型因人而已,常规的哈希取模采用大多采用将数据 hash 到 2^32 - 1的空间中,一致性哈希通常在此基础上将空间变成一个环。如下图所示。

​ 本次实现采用的是 key 按大小排列的哈希表。原打算使用数组承接数据,但排序成本随 key 的增多而加大,遂放弃。

  1. 数据存储

    数据存储与哈希取模算法大致相同,都是通过计算存入数据的哈希值放入对应的哈希槽上。但一致性哈希差异之处在于当计算 hash 不在环上,数据存入首个 hash 槽中。

    场景假设: 现已上线 4 节点(server1 ~ 4),对应 hash 值为 hash1 ~ 4。现有5个数据(hash1 ~ 5)于存入节点中,结果如下图所示。

​ 本次实现采用的思路是

1
2
3
1. 计算存入数据的 hash 值
2. 寻找最近的(比数据 hash 值大的最小的节点 hash)节点并写入
3. 若 2 中未能寻找服务器,则写入第一个(hash 最小)节点中
  1. 节点上线

​ 新节点加入一致性哈希环中,原理是通过计算节点所代表的 hash 值,并根据计算值将节点映射在环上,最后迁移相邻节点数据到新节点上。

​ 场景假设: 现已上线 4 台服务器(server1 ~ 4),对应 hash 值为 hash1 ~ 4。现有一个新节点(hash5)节点上线到环上。结果如下图所示。

​ 本次实现采用的思路是

1
2
3
4
5
1. 计算上线节点 hash 值
2. 计算上线节点所新增的虚拟节点的 hash 值(若初始化指定虚拟节点数量)
3. 寻找最近的(比上线节点与虚拟节点 hash 值大的最小的节点 hash)节点,取出节点数据
4. 将1 2点节点加入到 hash 环中
5. 将 3 中取出的数据重新放入到 hash 环上
  1. 节点下线

​ 已有节点下线,原理是通过计算节点所代表的 hash 值,取出节点所含数据,下线节点,将取出数据重新放入 hash 环上。

​ 场景假设: 现已上线 5 台服务器(server1 ~ 5),对应 hash 值为 hash1 ~ 5。现节点 server4 下线。结果如下图所示。

​ 本次实现采用的思路是

1
2
3
4
1. 计算下线节点 hash 值
2. 取出下线节点以及虚拟节点(若初始化指定虚拟节点数量)存储数据
3. 将下线节点以及虚拟节点(若初始化指定虚拟节点数量)从 hash 环上移除
4. 将 2 中数据重新放入到环上

代码实现

一致性哈希分为两个方案: 不带虚拟节点与带虚拟节点。而两个方案实现类似,所以本次实现将两种方案合在一起实现。实现如下。

1
2
3
4
5
6
7
8
9
10
11
12
13
14
15
16
17
18
19
20
21
22
23
24
25
26
27
28
29
30
31
32
33
34
35
36
37
38
39
40
41
42
43
44
45
46
47
48
49
50
51
52
53
54
package org.CommonAlgorithms.ConsistentHash;

import org.CommonAlgorithms.HashAlgorithm.HashService;
import java.util.List;

/**
* consistentHashing interface
* @author cartoon
* @since 10/01/2021
* @version 1.1
*/
public interface ConsistentHashing {

/**
* put data to hash loop
* @param data data list
* @return put result
*/
boolean putData(List<String> data);

/**
* put data to hash loop
* @param data data
* @return put result
*/
boolean putData(String data);

/**
* remove node from hash loop
* @param node removing node
* @return remove result
*/
boolean removeNode(String node);

/**
* add node to hash loop
* @param node adding node
* @return add result
*/
boolean addNode(String node);

/**
* inject hash method to hash loop
* @param hashService hash method
* @throws UnsupportedOperationException if loop already has node
*/
void setHashMethod(HashService hashService);

/**
* print all data in loop according ascending hash value with nodes
*/
void printAllData();

}
1
2
3
4
5
6
7
8
9
10
11
12
13
14
15
16
17
18
19
20
21
22
23
24
25
26
27
28
29
30
31
32
33
34
35
36
37
38
39
40
41
42
43
44
45
46
47
48
49
50
51
52
53
54
55
56
57
58
59
60
61
62
63
64
65
66
67
68
69
70
71
72
73
74
75
76
77
78
79
80
81
82
83
84
85
86
87
88
89
90
91
92
93
94
95
96
97
98
99
100
101
102
103
104
105
106
107
108
109
110
111
112
113
114
115
116
117
118
119
120
121
122
123
124
125
126
127
128
129
130
131
132
133
134
135
136
137
138
139
140
141
142
143
144
145
146
147
148
149
150
151
152
153
154
155
156
157
158
159
160
161
162
163
164
165
166
167
168
169
170
171
172
173
174
175
176
177
178
179
180
181
182
183
184
185
186
187
188
189
190
191
192
193
194
195
196
197
198
199
200
201
202
203
204
205
206
207
208
209
210
211
212
213
214
215
216
217
218
219
220
221
222
223
package org.CommonAlgorithms.ConsistentHash;

import org.CommonAlgorithms.HashAlgorithm.HashService;
import org.slf4j.Logger;
import org.slf4j.LoggerFactory;
import java.util.*;

/**
* consistent hash achieve
* @author cartoon
* @since 2021/01/17
*/
public class ConsistentHashingImpl implements ConsistentHashing {

private static final Logger log = LoggerFactory.getLogger(ConsistentHashingImpl.class);

/**
* virtual node name template
*/
private static final String virtualNodeFormat = "%s&&%d";

/**
* real node and its virtual node mapping
*/
private SortedMap<String, List<String>> realNodeToVirtualNode;

/**
* hash and its node mapping
*/
private SortedMap<Integer, String> hashToNodes;

/**
* node and its data mapping
*/
private Map<String, List<String>> nodeToData;

/**
* determine virtual node's number of each node
*/
private int virtualNodeNum;

/**
* inject hash method, if null, use loop default hash method
*/
private HashService hashService;


public ConsistentHashingImpl() {
this(0, new String[0]);
}

public ConsistentHashingImpl(String... nodes) {
this(0, nodes);
}

public ConsistentHashingImpl(int virtualNodeNum) {
this(virtualNodeNum, new String[0]);
}

public ConsistentHashingImpl(int virtualNodeNum, String... nodes) {
//1. intercept virtual num smaller than 0
if(virtualNodeNum < 0){
log.error("virtual num is not allow smaller than 0");
throw new IllegalArgumentException();
}
//2. initialize loop member attributes
this.virtualNodeNum = virtualNodeNum;
realNodeToVirtualNode = new TreeMap<>();
hashToNodes = new TreeMap<>();
nodeToData = new HashMap<>();
for(String server : nodes){
hashToNodes.put(getHash(server), server);
nodeToData.put(server, new LinkedList<>());
}
//3. if virtual node number bigger than 0, add virtual node
if(virtualNodeNum > 0){
for(String server : nodes){
addVirtualNode(server);
}
}
}

@Override
public boolean putData(List<String> data) {
//1. circulate call put data method to add data to loop
for(String incomingData : data){
if(!putData(incomingData)){
return false;
}
}
return true;
}

@Override
public boolean putData(String data) {
if(hashToNodes.isEmpty()){
log.error("put data, usable server is empty");
return false;
}
//1. calculate data's hash value
int currentHash = getHash(data);
//2. get usual node(node's hash value is bigger than data's hash value), if usual node list is empty, get first node in loop
SortedMap<Integer, String> usableNodes = hashToNodes.tailMap(currentHash);
String node = usableNodes.isEmpty() ? hashToNodes.get(hashToNodes.firstKey()) : usableNodes.get(usableNodes.firstKey());
//3. add data to node
List<String> dataList = nodeToData.get(node);
dataList.add(data);
log.info("put data, data {} is placed to server {}, hash: {}", data, node, currentHash);
return true;
}

@Override
public boolean removeNode(String node) {
//1. calculate hash value of removing node
int removeServerHash = getHash(node);
if(!hashToNodes.containsKey(removeServerHash)){
log.error("remove server, current server is not in server list, please check server ip");
return false;
}
//2. get data from removing node
List<String> removeServerData = nodeToData.get(node);
//3. get removing node's virtual node data, remove all virtual node with removing node
if(virtualNodeNum != 0){
for(String virtualNode : realNodeToVirtualNode.get(node)){
removeServerData.addAll(nodeToData.get(virtualNode));
hashToNodes.remove(getHash(virtualNode));
nodeToData.remove(virtualNode);
}
}
//4. remove node from hash loop
hashToNodes.remove(removeServerHash);
nodeToData.remove(node);
if(hashToNodes.size() == 0){
log.info("remove server, after remove, server list is empty");
return true;
}
//5. put data to loop by call put data method
putData(removeServerData);
log.info("remove server, remove server {} success", node);
return true;
}

@Override
public boolean addNode(String node) {
//1, calculate adding node's hash value
int addServerHash = getHash(node);
//2. add node and migrate data
if(hashToNodes.isEmpty()){
//2.1 add node and its virtual node to loop directly when current loop is empty
hashToNodes.put(addServerHash, node);
nodeToData.put(node, new LinkedList<>());
if(virtualNodeNum > 0){
addVirtualNode(node);
}
} else{
//2.2.1 get data to be migrated from loop
SortedMap<Integer, String> greatServers = hashToNodes.tailMap(addServerHash);
String greatServer = greatServers.isEmpty() ? hashToNodes.get(hashToNodes.firstKey()) : greatServers.get(greatServers.firstKey());
List<String> firstGreatServerData = new LinkedList<>(nodeToData.get(greatServer));
//2.2.2 add node and its virtual node to loop
hashToNodes.put(addServerHash, node);
nodeToData.put(greatServer, new LinkedList<>());
nodeToData.put(node, new LinkedList<>());
if(virtualNodeNum != 0){
addVirtualNode(node);
}
//2.2.3 migrate 2.2.1 data to loop by call put data method
putData(firstGreatServerData);
}
log.info("add server, server {} has been added", node);
return true;
}

@Override
public void printAllData() {
nodeToData.forEach((server, data) -> log.info("server {} contains data {}", server, data));
}

@Override
public void setHashMethod(HashService hashService) {
if(!hashToNodes.isEmpty()){
throw new UnsupportedOperationException();
}
this.hashService = hashService;
}

private void addVirtualNode(String realNode){
if(virtualNodeNum > 0){
List<String> virtualNodeList = new LinkedList<>();
for(int cnt = 0; cnt < this.virtualNodeNum; cnt++){
//1. generate virtual node name by default format
String virtualNodeName = String.format(virtualNodeFormat, realNode, cnt);
//2. calculate each virtual node's hash value
int virtualNodeHash = getHash(virtualNodeName);
//3. current node already exist in loop, continue
if(hashToNodes.containsKey(virtualNodeHash)){
continue;
}
//4. add node to loop
virtualNodeList.add(virtualNodeName);
hashToNodes.put(virtualNodeHash, virtualNodeName);
nodeToData.put(virtualNodeName, new LinkedList<>());
}
//5. map virtual node to real node
realNodeToVirtualNode.put(realNode, virtualNodeList);
}
}


private int getHash(String data){
return hashService == null ? defaultGetHash(data) : hashService.getHash(data);
}

private int defaultGetHash(String data){
int res = 0;
for(char tempChar : data.toCharArray()){
if(tempChar >= '0' && tempChar <= '9'){
res += tempChar;
}
}
return res;
}
}

测试结果

不带虚拟节点的一致性哈希
测试代码
1
2
3
4
5
6
7
8
9
10
11
12
13
14
15
16
17
18
19
20
21
22
23
24
25
26
27
28
29
30
31
32
33
34
35
36
37
38
39
40
41
42
package ConsistentHash;

import org.CommonAlgorithms.ConsistentHash.ConsistentHashing;
import org.CommonAlgorithms.ConsistentHash.ConsistentHashingImpl;
import org.junit.Assert;
import org.junit.Before;
import org.junit.Test;
import org.slf4j.Logger;
import org.slf4j.LoggerFactory;

/**
* @author cartoon
* @date 2020/12/27
*/
public class ConsistentHashingWithoutVirtualNodeTest {

private static final Logger log = LoggerFactory.getLogger(ConsistentHashingWithoutVirtualNodeTest.class);

private ConsistentHashing consistentHashing;

private String[] servers;

private String[] data;

@Before
public void before(){
servers = new String[]{"000", "111", "222", "333", "555"};
consistentHashing = new ConsistentHashingImpl(servers);
data = new String[]{"000", "111", "222", "333", "555"};
}

@Test
public void testConsistentHashing(){
for(String str : data){
Assert.assertTrue(consistentHashing.putData(str));
}
consistentHashing.removeNode("333");
consistentHashing.addNode("444");
consistentHashing.putData("444");
consistentHashing.printAllData();
}
}
测试结果
1
2
3
4
5
6
7
8
9
10
11
12
13
14
15
16
[main] INFO org.CommonAlgorithms.ConsistentHash.ConsistentHashingImpl - put data, data 000 is placed to server 000, hash: 144
[main] INFO org.CommonAlgorithms.ConsistentHash.ConsistentHashingImpl - put data, data 111 is placed to server 111, hash: 147
[main] INFO org.CommonAlgorithms.ConsistentHash.ConsistentHashingImpl - put data, data 222 is placed to server 222, hash: 150
[main] INFO org.CommonAlgorithms.ConsistentHash.ConsistentHashingImpl - put data, data 333 is placed to server 333, hash: 153
[main] INFO org.CommonAlgorithms.ConsistentHash.ConsistentHashingImpl - put data, data 555 is placed to server 555, hash: 159
[main] INFO org.CommonAlgorithms.ConsistentHash.ConsistentHashingImpl - put data, data 333 is placed to server 555, hash: 153
[main] INFO org.CommonAlgorithms.ConsistentHash.ConsistentHashingImpl - remove server, remove server 333 success
[main] INFO org.CommonAlgorithms.ConsistentHash.ConsistentHashingImpl - put data, data 555 is placed to server 555, hash: 159
[main] INFO org.CommonAlgorithms.ConsistentHash.ConsistentHashingImpl - put data, data 333 is placed to server 444, hash: 153
[main] INFO org.CommonAlgorithms.ConsistentHash.ConsistentHashingImpl - add server, server 444 has been added
[main] INFO org.CommonAlgorithms.ConsistentHash.ConsistentHashingImpl - put data, data 444 is placed to server 444, hash: 156
[main] INFO org.CommonAlgorithms.ConsistentHash.ConsistentHashingImpl - server 000 contains data [000]
[main] INFO org.CommonAlgorithms.ConsistentHash.ConsistentHashingImpl - server 111 contains data [111]
[main] INFO org.CommonAlgorithms.ConsistentHash.ConsistentHashingImpl - server 222 contains data [222]
[main] INFO org.CommonAlgorithms.ConsistentHash.ConsistentHashingImpl - server 444 contains data [333, 444]
[main] INFO org.CommonAlgorithms.ConsistentHash.ConsistentHashingImpl - server 555 contains data [555]
含虚拟节点的一致性哈希测试
测试代码
1
2
3
4
5
6
7
8
9
10
11
12
13
14
15
16
17
18
19
20
21
22
23
24
25
26
27
28
29
30
31
32
33
34
35
36
37
38
39
40
41
42
43
package ConsistentHash;

import org.CommonAlgorithms.ConsistentHash.ConsistentHashing;
import org.CommonAlgorithms.ConsistentHash.ConsistentHashingImpl;
import org.junit.Assert;
import org.junit.Before;
import org.junit.Test;
import org.slf4j.Logger;
import org.slf4j.LoggerFactory;

/**
* @author cartoon
* @date 2021/01/17
*/
public class ConsistentHashingWithVirtualNodeTest {

private static final Logger log = LoggerFactory.getLogger(ConsistentHashingWithVirtualNodeTest.class);

private ConsistentHashing consistentHashing;

private String[] servers;

private String[] data;

@Before
public void before(){
servers = new String[]{"000", "111", "222", "333", "555"};
consistentHashing = new ConsistentHashingImpl(3, servers);
data = new String[]{"000", "111", "222", "333", "555"};
}

@Test
public void testConsistentHashing(){
for(String str : data){
Assert.assertTrue(consistentHashing.putData(str));
}
consistentHashing.removeNode("333");
consistentHashing.addNode("444");
consistentHashing.putData("444");
consistentHashing.putData("555&&0");
consistentHashing.printAllData();
}
}
测试结果
1
2
3
4
5
6
7
8
9
10
11
12
13
14
15
16
17
18
19
20
21
22
23
24
25
26
27
28
29
30
31
32
[main] INFO org.CommonAlgorithms.ConsistentHash.ConsistentHashingImpl - put data, data 000 is placed to server 000, hash: 144
[main] INFO org.CommonAlgorithms.ConsistentHash.ConsistentHashingImpl - put data, data 111 is placed to server 111, hash: 147
[main] INFO org.CommonAlgorithms.ConsistentHash.ConsistentHashingImpl - put data, data 222 is placed to server 222, hash: 150
[main] INFO org.CommonAlgorithms.ConsistentHash.ConsistentHashingImpl - put data, data 333 is placed to server 333, hash: 153
[main] INFO org.CommonAlgorithms.ConsistentHash.ConsistentHashingImpl - put data, data 555 is placed to server 555, hash: 159
[main] INFO org.CommonAlgorithms.ConsistentHash.ConsistentHashingImpl - put data, data 333 is placed to server 555, hash: 153
[main] INFO org.CommonAlgorithms.ConsistentHash.ConsistentHashingImpl - remove server, remove server 333 success
[main] INFO org.CommonAlgorithms.ConsistentHash.ConsistentHashingImpl - put data, data 555 is placed to server 555, hash: 159
[main] INFO org.CommonAlgorithms.ConsistentHash.ConsistentHashingImpl - put data, data 333 is placed to server 444, hash: 153
[main] INFO org.CommonAlgorithms.ConsistentHash.ConsistentHashingImpl - add server, server 444 has been added
[main] INFO org.CommonAlgorithms.ConsistentHash.ConsistentHashingImpl - put data, data 444 is placed to server 444, hash: 156
[main] INFO org.CommonAlgorithms.ConsistentHash.ConsistentHashingImpl - put data, data 555&&0 is placed to server 555&&0, hash: 207
[main] INFO org.CommonAlgorithms.ConsistentHash.ConsistentHashingImpl - server 000&&2 contains data []
[main] INFO org.CommonAlgorithms.ConsistentHash.ConsistentHashingImpl - server 000&&1 contains data []
[main] INFO org.CommonAlgorithms.ConsistentHash.ConsistentHashingImpl - server 000&&0 contains data []
[main] INFO org.CommonAlgorithms.ConsistentHash.ConsistentHashingImpl - server 111&&1 contains data []
[main] INFO org.CommonAlgorithms.ConsistentHash.ConsistentHashingImpl - server 111&&2 contains data []
[main] INFO org.CommonAlgorithms.ConsistentHash.ConsistentHashingImpl - server 555&&1 contains data []
[main] INFO org.CommonAlgorithms.ConsistentHash.ConsistentHashingImpl - server 555&&2 contains data []
[main] INFO org.CommonAlgorithms.ConsistentHash.ConsistentHashingImpl - server 222&&2 contains data []
[main] INFO org.CommonAlgorithms.ConsistentHash.ConsistentHashingImpl - server 444&&0 contains data []
[main] INFO org.CommonAlgorithms.ConsistentHash.ConsistentHashingImpl - server 444&&1 contains data []
[main] INFO org.CommonAlgorithms.ConsistentHash.ConsistentHashingImpl - server 444&&2 contains data []
[main] INFO org.CommonAlgorithms.ConsistentHash.ConsistentHashingImpl - server 555&&0 contains data [555&&0]
[main] INFO org.CommonAlgorithms.ConsistentHash.ConsistentHashingImpl - server 000 contains data [000]
[main] INFO org.CommonAlgorithms.ConsistentHash.ConsistentHashingImpl - server 111 contains data [111]
[main] INFO org.CommonAlgorithms.ConsistentHash.ConsistentHashingImpl - server 222 contains data [222]
[main] INFO org.CommonAlgorithms.ConsistentHash.ConsistentHashingImpl - server 222&&0 contains data []
[main] INFO org.CommonAlgorithms.ConsistentHash.ConsistentHashingImpl - server 444 contains data [333, 444]
[main] INFO org.CommonAlgorithms.ConsistentHash.ConsistentHashingImpl - server 555 contains data [555]
[main] INFO org.CommonAlgorithms.ConsistentHash.ConsistentHashingImpl - server 222&&1 contains data []
[main] INFO org.CommonAlgorithms.ConsistentHash.ConsistentHashingImpl - server 111&&0 contains data []

实现存在的缺陷

1
2
3
1. 哈希算法过于简单,哈希冲突概率较大
2. 真实节点含有虚拟节点的数量不均
3. 节点上线时真实节点与已存在的虚拟节点的顺序冲突尚未解决

后记

本次实现的所有代码已全部上传到 https://github.com/cartoonYu/CommonAlgorithms,项目主要包含一些常用的算法,如排序算法,限流算法的简单实现,欢迎提 issue。

本文首发于cartoon的博客

转载请注明出处:https://cartoonyu.github.io
前言

最近在写框架时遇到需要根据特定配置(可能不存在)加载 bean 的需求,所以就学习了下 Spring 中如何获取配置的几种方式。

Spring 中获取配置的三种方式

  1. 通过 @Value 方式动态获取单个配置
  2. 通过 @ConfigurationProperties + 前缀方式批量获取配置
  3. 通过 Environment 动态获取单个配置

通过 @Value 动态获取单个配置

  1. 作用

    1. 可修饰到任一变量获取,使用较灵活
  2. 优点

    1. 使用简单,且使用关联的链路较短
  3. 缺点

    1. 配置名不能被有效枚举到

    2. 每一个配置的使用都需重新定义,使用较为麻烦

    3. 项目强依赖配置的定义,配置不存在则会导致项目无法启动

  4. 使用场景

    1. 项目强依赖该配置的加载,想要从源头避免因配置缺失导致的未知问题

    2. 只想使用少数几个配置

  5. 代码示例

    1
    2
    3
    4
    5
    6
    7
    8
    9
    10
    @Configuration
    public class ConfigByValueAnnotation {

    @Value("${server.port}")
    private String serverPort;

    public String getServerPort() {
    return serverPort;
    }
    }
  6. 测试代码

1
2
3
4
5
6
7
8
9
10
11
12
13
14
@DisplayName("multipart get config")
@SpringBootTest
public class MultipartGetConfigTest {

private static final Logger log = LoggerFactory.getLogger(MultipartGetConfigTest.class);

@Autowired
private ConfigByValueAnnotation configByValueAnnotation;

@Test
public void getByValueAnnotation(){
log.info("get by @Value, value: {}", configByValueAnnotation.getServerPort());
}
}
  1. 测试结果
1
org.spring.demo.MultipartGetConfigTest   : get by @Value, value: 7100

通过 @ConfigurationProperties + 前缀方式批量获取

  1. 作用

    1. 用于配置类的修饰或批量配置的获取
  2. 优点

    1. 使用配置只需确定 key 的前缀即能使用,有利于批量获取场景的使用

    2. 因采用前缀匹配,所以在使用新的相同前缀 key 的配置时无需改动代码

  3. 缺点

    1. 使用复杂,需定义配置类或者手动创建 bean 后引入使用

    2. 增加新的前缀相同 key 时可能会引入不稳定因素

  4. 使用场景

    1. 需要同时使用多前缀相同 key 的配置

    2. 期望增加新配置但不修改代码的 properties 注入

  5. 代码示例

    1
    2
    3
    4
    5
    6
    7
    8
    9
    10
    11
    12
    13
    14
    15
    @Component
    @ConfigurationProperties(prefix = "server", ignoreInvalidFields = true)
    public class ConfigByConfigurationProperties {

    private Integer port;

    public Integer getPort() {
    return port;
    }

    public ConfigByConfigurationProperties setPort(Integer port) {
    this.port = port;
    return this;
    }
    }
    1
    2
    3
    4
    5
    6
    7
    8
    9
    10
    @Configuration
    public class ConfigByConfigurationPropertiesV2 {

    @Bean("configByValueAnnotationV2")
    @ConfigurationProperties(prefix = "server2")
    public Properties properties(){
    return new Properties();
    }

    }
    1. 测试代码
1
2
3
4
5
6
7
8
9
10
11
12
13
14
15
16
17
18
19
20
@DisplayName("multipart get config")
@SpringBootTest
public class MultipartGetConfigTest {

private static final Logger log = LoggerFactory.getLogger(MultipartGetConfigTest.class);

@Autowired
private ConfigByConfigurationProperties configByConfigurationProperties;

@Autowired
@Qualifier("configByValueAnnotationV2")
private Properties properties;

@Test
public void getByConfigurationProperties(){
log.info("get by @ConfigurationProperties, value: {}", configByConfigurationProperties.getPort());
log.info("get by @ConfigurationProperties and manual create bean, value: {}", properties.getProperty("port"));
}

}
  1. 测试结果
1
2
org.spring.demo.MultipartGetConfigTest   : get by @ConfigurationProperties, value: 7100
org.spring.demo.MultipartGetConfigTest : get by @ConfigurationProperties and manual create bean, value: 7100

通过 Environment 动态获取单个配置

  1. 作用

    1. 用于动态在程序代码中获取配置,而配置 key 不需提前定义
  2. 优点

    1. 获取的配置的 key 可不提前定义,程序灵活性高

    2. 配置 key 可使用枚举统一放置与管理

  3. 缺点

    1. 使用较复杂,需继承 Environment 接口形成工具类进行获取

    2. 获取 key 对应的枚举与 key 定义分离,value 获取链路较长

  4. 使用场景

    1. 只需使用少量的配置

    2. 获取配置的 key 无提前定义,需要根据对配置的有无进行灵活使用

  5. 代码示例

1
2
3
4
5
6
7
8
9
10
11
12
13
14
15
16
17
18
19
20
21
22
23
24
25
26
27
28
29
30
31
32
33
34
35
36
37
38
39
40
41
42
43
44
45
46
47
@Component
public class ConfigByEnvironment implements EnvironmentAware {

private static final Logger log = LoggerFactory.getLogger(ConfigByEnvironment.class);

private Environment environment;

public Optional<String> get(String configKey){
String config = environment.getProperty(configKey);
return Objects.isNull(config) ? Optional.empty() : Optional.of(config);
}

public void get(String configKey, Consumer<String> consumer){
Optional<String> config = get(configKey);
if(!config.isPresent()){
log.warn("application config, get config by key fail, key: {}", configKey);
}
config.ifPresent(consumer);
}

@Override
public void setEnvironment(@NonNull Environment environment) {
this.environment = environment;
}
}

public enum ConfigByEnvironmentKey {

SERVER_PORT("server.port", "server port");

private String key;

private String description;

ConfigByEnvironmentKey(String key, String description) {
this.key = key;
this.description = description;
}

public String getKey() {
return key;
}

public String getDescription() {
return description;
}
}
  1. 测试代码
1
2
3
4
5
6
7
8
9
10
11
12
13
14
15
@DisplayName("multipart get config")
@SpringBootTest
public class MultipartGetConfigTest {

private static final Logger log = LoggerFactory.getLogger(MultipartGetConfigTest.class);

@Autowired
private ConfigByEnvironment configByEnvironment;

@Test
public void getByEnvironment(){
configByEnvironment.get(ConfigByEnvironmentKey.SERVER_PORT.getKey()).ifPresent(value -> log.info("get by environment, value: {}", value));
}

}
  1. 测试结果
1
org.spring.demo.MultipartGetConfigTest   : get by environment, value: 7100

总结

获取配置方式 优点 缺点 使用场景
通过 @Value 动态获取单个配置 使用简单,且使用关联的链路较短 1. 配置名不能被有效枚举到
2. 每一个配置的使用都需重新定义,使用较为麻烦
3. 项目强依赖配置的定义,配置不存在则会导致项目无法启动
1. 项目强依赖该配置的加载,想要从源头避免因配置缺失导致的未知问题
2. 只想使用少数几个配置
通过 @ConfigurationProperties + 前缀方式批量获取 1. 使用配置只需确定 key 的前缀即能使用,有利于批量获取场景的使用
2. 因采用前缀匹配,所以在使用新的相同前缀 key 的配置时无需改动代码
1. 使用复杂,需定义配置类或者手动创建 bean 后引入使用
2. 增加新的前缀相同 key 时可能会引入不稳定因素
1. 需要同时使用多前缀相同 key 的配置
2. 期望增加新配置但不修改代码的 properties 注入
通过 Environment 动态获取单个配置 1. 获取的配置的 key 可不提前定义,程序灵活性高
2. 配置 key 可使用枚举统一放置与管理
1. 使用较复杂,需继承 Environment 接口形成工具类进行获取
2. 获取 key 对应的枚举与 key 定义分离,value 获取链路较长
1. 只需使用少量的配置
2. 获取配置的 key 无提前定义,需要根据对配置的有无进行灵活使用

本代码示例已放置于 github测试代码位置,有需要的可自取。

本文首发于 cartoon的博客

前言

这段时间在构建自己的开发工具集,避不开的就是各种中间件访问层的搭建。而 spring cloud 唯二绕不开的就是 eureka 了,所以就重复造轮子,以后忘记了也有所参考。

正文

前期准备

maven/gradle

eureka 服务器搭建

  1. 新建 spring boot 空项目

    这一步其实是非必要的,你也可以新建 maven/gradle 空项目或者普通的 web项目, 只是 spring boot 的自动配置比较方便。

  2. 修改 pom.xml 或者 build.gradle 文件(此处示例为 pom.xml 文件)

    1
    2
    3
    4
    5
    6
    7
    8
    9
    10
    11
    12
    13
    14
    15
    16
    17
    18
    19
    20
    21
    22
    23
    24
    25
    26
    27
    28
    29
    30
    31
    32
    33
    34
    35
    36
    37
    38
    39
    40
    41
    42
    43
    44
    45
    46
    47
    48
    49
    50
    51
    52
    53
    54
    55
    56
    57
    58
    59
    60
    61
    62
    63
    64
    65
    66
    67
    68
    69
    70
    71
    <?xml version="1.0" encoding="UTF-8"?>
    <project xmlns="http://maven.apache.org/POM/4.0.0" xmlns:xsi="http://www.w3.org/2001/XMLSchema-instance"
    xsi:schemaLocation="http://maven.apache.org/POM/4.0.0 https://maven.apache.org/xsd/maven-4.0.0.xsd">
    <modelVersion>4.0.0</modelVersion>
    <parent>
    <groupId>org.springframework.boot</groupId>
    <artifactId>spring-boot-starter-parent</artifactId>
    <version>2.3.4.RELEASE</version>
    <relativePath/> <!-- lookup parent from repository -->
    </parent>
    <groupId>com</groupId>
    <artifactId>eureka</artifactId>
    <version>1.0.0</version>
    <name>eureka</name>
    <description>Demo project for Spring Boot</description>

    <properties>
    <java.version>1.8</java.version>
    <spring-cloud.version>Hoxton.SR8</spring-cloud.version>
    </properties>

    <dependencies>
    <dependency>
    <groupId>org.springframework.cloud</groupId>
    <artifactId>spring-cloud-starter-netflix-eureka-server</artifactId>
    </dependency>

    <dependency>
    <groupId>org.springframework.boot</groupId>
    <artifactId>spring-boot-starter-test</artifactId>
    <scope>test</scope>
    <exclusions>
    <exclusion>
    <groupId>org.junit.vintage</groupId>
    <artifactId>junit-vintage-engine</artifactId>
    </exclusion>
    </exclusions>
    </dependency>
    </dependencies>

    <dependencyManagement>
    <dependencies>
    <dependency>
    <groupId>org.springframework.cloud</groupId>
    <artifactId>spring-cloud-dependencies</artifactId>
    <version>${spring-cloud.version}</version>
    <type>pom</type>
    <scope>import</scope>
    </dependency>
    </dependencies>
    </dependencyManagement>

    <build>
    <plugins>
    <plugin>
    <groupId>org.apache.maven.plugins</groupId>
    <artifactId>maven-compiler-plugin</artifactId>
    <version>3.8.1</version>
    <configuration>
    <source>1.8</source>
    <target>1.8</target>
    <encoding>UTF-8</encoding>
    </configuration>
    </plugin>
    <plugin>
    <groupId>org.springframework.boot</groupId>
    <artifactId>spring-boot-maven-plugin</artifactId>
    </plugin>
    </plugins>
    </build>
    </project>
  3. 修改项目配置文件 application.yml

    1
    2
    3
    4
    5
    6
    7
    8
    9
    10
    server:
    port: 8761
    eureka:
    instance:
    hostname: eureka-server
    client:
    register-with-eureka: false
    fetch-registry: false
    service-url:
    defaultZone: http://${eureka.instance.hostname}:${server.port}/eureka/
  4. 启动类增加 @EnableEurekaServer 注解

    1
    2
    3
    4
    5
    6
    7
    8
    9
    @EnableEurekaServer
    @SpringBootApplication
    public class EurekaApplication {

    public static void main(String[] args) {
    SpringApplication.run(EurekaApplication.class, args);
    }

    }

经过上述步骤启动项目,eureka服务器就启动完成了。

服务提供者与消费者构建

服务提供者构建
  1. 新建 spring boot 空项目
  2. 修改 pom.xml 或者 build.gradle 文件(此处示例为 pom.xml 文件)
1
2
3
4
5
6
7
8
9
10
11
12
13
14
15
16
17
18
19
20
21
22
23
24
25
26
27
28
29
30
31
32
33
34
35
36
37
38
39
40
41
42
43
44
45
46
47
48
49
50
51
52
53
54
55
56
57
58
59
60
61
62
63
64
65
66
67
68
69
70
71
72
73
74
75
76
<?xml version="1.0" encoding="UTF-8"?>
<project xmlns="http://maven.apache.org/POM/4.0.0" xmlns:xsi="http://www.w3.org/2001/XMLSchema-instance"
xsi:schemaLocation="http://maven.apache.org/POM/4.0.0 https://maven.apache.org/xsd/maven-4.0.0.xsd">
<modelVersion>4.0.0</modelVersion>
<parent>
<groupId>org.springframework.boot</groupId>
<artifactId>spring-boot-starter-parent</artifactId>
<version>2.3.4.RELEASE</version>
<relativePath/> <!-- lookup parent from repository -->
</parent>
<groupId>com</groupId>
<artifactId>eurekaclient</artifactId>
<version>1.0.0</version>
<name>EurekaClient</name>
<description>Demo project for Spring Boot</description>

<properties>
<java.version>1.8</java.version>
<spring-cloud.version>Hoxton.SR8</spring-cloud.version>
</properties>

<dependencies>
<dependency>
<groupId>org.springframework.boot</groupId>
<artifactId>spring-boot-starter-web</artifactId>
</dependency>
<dependency>
<groupId>org.springframework.cloud</groupId>
<artifactId>spring-cloud-starter-netflix-eureka-client</artifactId>
</dependency>

<dependency>
<groupId>org.springframework.boot</groupId>
<artifactId>spring-boot-starter-test</artifactId>
<scope>test</scope>
<exclusions>
<exclusion>
<groupId>org.junit.vintage</groupId>
<artifactId>junit-vintage-engine</artifactId>
</exclusion>
</exclusions>
</dependency>
</dependencies>

<dependencyManagement>
<dependencies>
<dependency>
<groupId>org.springframework.cloud</groupId>
<artifactId>spring-cloud-dependencies</artifactId>
<version>${spring-cloud.version}</version>
<type>pom</type>
<scope>import</scope>
</dependency>
</dependencies>
</dependencyManagement>

<build>
<plugins>
<plugin>
<groupId>org.apache.maven.plugins</groupId>
<artifactId>maven-compiler-plugin</artifactId>
<version>3.8.1</version>
<configuration>
<source>1.8</source>
<target>1.8</target>
<encoding>UTF-8</encoding>
</configuration>
</plugin>
<plugin>
<groupId>org.springframework.boot</groupId>
<artifactId>spring-boot-maven-plugin</artifactId>
</plugin>
</plugins>
</build>

</project>
  1. 修改项目配置文件 application.yml
1
2
3
4
5
6
7
eureka:
client:
service-url:
defaultZone: http://cartoon-ali.com:6001/eureka/ # 取决于你的eureka地址
spring:
application:
name: DemoProducer
  1. 新建模拟接口
1
2
3
4
5
6
7
8
@RestController
public class TextController {

@GetMapping("text")
public String text(){
return "eureka producer";
}
}
服务消费者构建
  1. 新建 spring boot 空项目
  2. 修改 pom.xml 或者 build.gradle 文件(此处示例为 pom.xml 文件)
1
2
3
4
5
6
7
8
9
10
11
12
13
14
15
16
17
18
19
20
21
22
23
24
25
26
27
28
29
30
31
32
33
34
35
36
37
38
39
40
41
42
43
44
45
46
47
48
49
50
51
52
53
54
55
56
57
58
59
60
61
62
63
64
65
66
67
68
69
70
71
72
73
74
75
76
77
78
79
80
81
82
83
<?xml version="1.0" encoding="UTF-8"?>
<project xmlns="http://maven.apache.org/POM/4.0.0" xmlns:xsi="http://www.w3.org/2001/XMLSchema-instance"
xsi:schemaLocation="http://maven.apache.org/POM/4.0.0 https://maven.apache.org/xsd/maven-4.0.0.xsd">
<modelVersion>4.0.0</modelVersion>
<parent>
<groupId>org.springframework.boot</groupId>
<artifactId>spring-boot-starter-parent</artifactId>
<version>2.3.4.RELEASE</version>
<relativePath/> <!-- lookup parent from repository -->
</parent>
<groupId>org</groupId>
<artifactId>eurekaclient2</artifactId>
<version>0.0.1-SNAPSHOT</version>
<name>eurekaclient2</name>
<description>Demo project for Spring Boot</description>

<properties>
<java.version>1.8</java.version>
<spring-cloud.version>Hoxton.SR8</spring-cloud.version>
</properties>

<dependencies>
<dependency>
<groupId>org.springframework.boot</groupId>
<artifactId>spring-boot-starter</artifactId>
</dependency>

<dependency>
<groupId>org.springframework.boot</groupId>
<artifactId>spring-boot-starter-test</artifactId>
<scope>test</scope>
<exclusions>
<exclusion>
<groupId>org.junit.vintage</groupId>
<artifactId>junit-vintage-engine</artifactId>
</exclusion>
</exclusions>
</dependency>

<dependency>
<groupId>org.springframework.cloud</groupId>
<artifactId>spring-cloud-starter-netflix-eureka-client</artifactId>
</dependency>

<dependency>
<groupId>org.springframework.boot</groupId>
<artifactId>spring-boot-starter-web</artifactId>
</dependency>

</dependencies>

<dependencyManagement>
<dependencies>
<dependency>
<groupId>org.springframework.cloud</groupId>
<artifactId>spring-cloud-dependencies</artifactId>
<version>${spring-cloud.version}</version>
<type>pom</type>
<scope>import</scope>
</dependency>
</dependencies>
</dependencyManagement>

<build>
<plugins>
<plugin>
<groupId>org.apache.maven.plugins</groupId>
<artifactId>maven-compiler-plugin</artifactId>
<version>3.8.1</version>
<configuration>
<source>1.8</source>
<target>1.8</target>
<encoding>UTF-8</encoding>
</configuration>
</plugin>
<plugin>
<groupId>org.springframework.boot</groupId>
<artifactId>spring-boot-maven-plugin</artifactId>
</plugin>
</plugins>
</build>

</project>
  1. 修改项目配置文件 application.yml
1
2
3
4
5
6
7
8
9
eureka:
client:
service-url:
defaultZone: http://cartoon-ali.com:6001/eureka/ # 取决于你的eureka地址
spring:
application:
name: DemoConsumer
server:
port: 8081
  1. 模拟消费接口构建
1
2
3
4
5
6
7
8
9
10
11
12
@RestController
public class TextController {

@Autowired
private RestTemplate restTemplate;

@RequestMapping("/text")
public String text(){
return restTemplate.getForObject("http://DEMOPRODUCER/text", String.class);
}
}

启动

同时启动服务提供者与消费者,调用消费者模拟消费接口,即能看到调用的结果。

后记

项目代码已收录在我的个人工具集。因为我在工具集全面应用了 easyopen 做接口的收拢,所以关于 eureka 相关的内容可能有点不一样,但是总体步骤是一样的,欢迎 star

&nbsp;&nbsp;&nbsp;&nbsp;本文首发于 cartoon的博客
&nbsp;&nbsp;&nbsp;&nbsp;转载请注明出处:https://cartoonyu.github.io/cartoon-blog/post/spring-cloud/Eureka服务端与客户端搭建/

近段时间学习极客时间李玥老师的后端存储实战课时,看到一个很多意思的东西:用kafka存储点击流的数据,并重复处理。在以往的使用中,kafka只是一个消息传输的载体,消息被消费后就不能再次消费。新知识与印象相冲突,于是就有了本篇文章:kafka数据如何被重复消费。

前期理论了解

首先我先去官网纠正了我对kafka的整体了解。

官网对kafka的描述是:一个分布式流平台。怪自己的学艺不精。

其次,我重新看了一下kafka消费者的消费过程:kafka首先通过push/poll(默认为poll)获取消息,接收消息处理完成后手动/自动提交消费成功,kafka服务器则根据提交情况决定是否移动当前偏移量。

方案确定

kafka消费者读取数据的位置是通过偏移量判断,那如果我能将偏移量手动设置为起始位置,就能实现重复消费?这个有搞头。

如何手动设置偏移量是关键。

show me the code

代码的关键主要在于偏移量设置 api 的调用,其余没什么特别。

要注意的是,代码中我分别调用了作用不同的设置偏移量,仅作为展示,可按需取用。

最后消费者消息消息时,我只使用默认的拉取条数设置消费一次,可按需进行修改。

1
2
3
4
5
6
7
8
9
10
11
12
13
14
15
16
17
18
19
20
21
22
23
24
25
26
27
28
29
30
31
32
33
34
35
36
37
38
39
40
41
42
43
/**
* repeat kafka message
* @param host kafka host
* @param groupId kafka consumer group id
* @param autoCommit whether auto commit consume
* @param topic consume topic
* @param consumeTimeOut consume time out
*/
private void textResetOffset(String host, String groupId, Boolean autoCommit, String topic, Long consumeTimeOut){
//form a properties to new consumer
Properties properties = new Properties();
properties.setProperty(ConsumerConfig.BOOTSTRAP_SERVERS_CONFIG, host);
properties.setProperty(ConsumerConfig.GROUP_ID_CONFIG, groupId);
properties.setProperty(ConsumerConfig.ENABLE_AUTO_COMMIT_CONFIG, autoCommit.toString());
properties.setProperty(ConsumerConfig.KEY_DESERIALIZER_CLASS_CONFIG, StringDeserializer.class.getName());
properties.setProperty(ConsumerConfig.VALUE_DESERIALIZER_CLASS_CONFIG, StringDeserializer.class.getName());
KafkaConsumer<String, String> consumer = new KafkaConsumer<>(properties);
//subscribe incoming topic
consumer.subscribe(Collections.singletonList(topic));
//get consumer consume partitions
List<PartitionInfo> partitionInfos = consumer.partitionsFor(topic);
List<TopicPartition> topicPartitions = new ArrayList<>();
for(PartitionInfo partitionInfo : partitionInfos){
TopicPartition topicPartition = new TopicPartition(partitionInfo.topic(), partitionInfo.partition());
topicPartitions.add(topicPartition);
}
// poll data from kafka server to prevent lazy operation
consumer.poll(Duration.ofSeconds(consumeTimeOut));
//reset offset from beginning
consumer.seekToBeginning(topicPartitions);
//reset designated partition offset by designated spot
int offset = 20;
consumer.seek(topicPartitions.get(0), offset);
//reset offset to end
consumer.seekToEnd(topicPartitions);
//consume message as usual
ConsumerRecords<String, String> records = consumer.poll(Duration.ofSeconds(1));
Iterator<ConsumerRecord<String, String>> iterator = records.iterator();
while (iterator.hasNext()){
ConsumerRecord<String, String> record = iterator.next();
log.info("consume data: {}", record.value());
}
}
运行结果

需注意的点

在手动设置偏移量时,遇到了一个exception

1
java.lang.IllegalStateException: No current assignment for partition test-0

翻了一下stackoverflow以及官方文档后,才了解到设置偏移量是一个lazy operation,官网的解释如下。

Seek to the first offset for each of the given partitions. This function evaluates lazily, seeking to the first offset in all partitions only when poll(long) or position(TopicPartition) are called. If no partition is provided, seek to the first offset for all of the currently assigned partitions.

于是我先进行一次 poll 操作后再设置偏移量。

&nbsp;&nbsp;&nbsp;&nbsp;本文首发于 cartoon的博客

&nbsp;&nbsp;&nbsp;&nbsp;转载请注明出处:https://cartoonyu.github.io/cartoon-blog/post/message-queue/kafka数据如何被重复消费/